
Download Gatling from https://gatling.io/open-source
Make sure you have JDK 8 or new installed.
Unzip the file anywhere on your computer. Open up the new folder, and browse to the bin directory. From here.
1.) Run gatling.bat
Press 0 to choose the computerdatabase.BasicSimulation.
Description is optional and can be left blank.
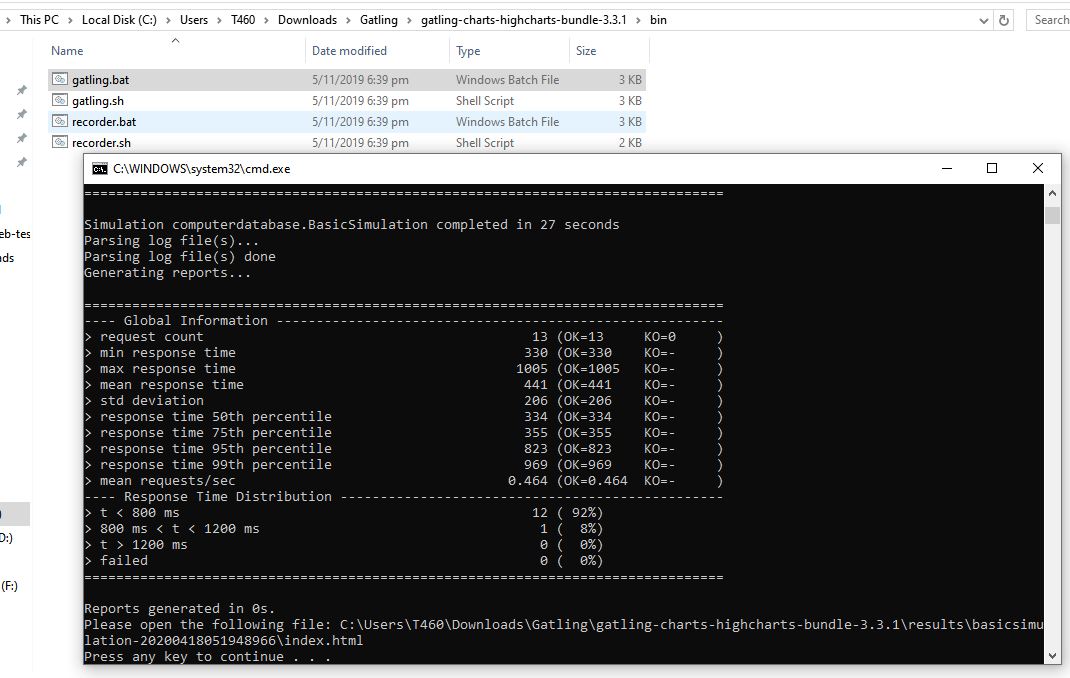
Gatling will the script that you choose - which executes a basic load test against the Gatling computer database training site.
Results will be generated and looks like below

Gatling Project Setup
For Gatling we will write code in Scala.
Scala sits on top of the JVM, so any IDE which supports JVM we can use, I will be using IntelliJ
Gatling can be setup using Maven Build Tool
https://gatling.io/docs/current/extensions/maven_plugin/
Create Gatling Project with Maven Archetype
1.)Open CMD and type mvn archetype:generate

You will see message like below
2.) Choose a number or apply filter (format: [groupId:]artifactId, case sensitive contains): 1589:

Type gatling
Press 1 and then choose 35 as the version


Press Y to confirm
You will see message like
[INFO] Project created from Archetype in dir: C:\Users\T460\myGatlingTest
[INFO] ------------------------------------------------------------------------
[INFO] BUILD SUCCESS
[INFO] ------------------------------------------------------------------------
[INFO] Total time: 13:05 min
[INFO] Finished at: 2020-04-18T13:43:17+08:00
[INFO] Final Memory: 16M/291M
[INFO] ------------------------------------------------------------------------
3.) Now Import the created project in IntelliJ IDEA

Now we need to Setup Scala on Machine
4.) Download Scala libraries from here
https://www.scala-lang.org/download/

Install Scala Plugin in IntelliJ and Restart
Now after restart ,Go to Scala file and you will see option on the top to "Setup Scala SDK" refer below Screenshot

Click Create Button select the version and Click OK
Right-click on the scala folder and click Mark Directory As -> Test Sources Root:
Also mark the main src folder as sources root as well
Add a Sample Gatling Script
Right-click on the scala folder and select New > Scala Package - give the package a name of computerdatabase . Right click on this folder and select New > Scala Class - give the class a name of BasicSimulation.
Sample Script
package computerdatabase
import io.gatling.core.Predef._
import io.gatling.http.Predef._
import scala.concurrent.duration._
class BasicSimulation extends Simulation {
val httpProtocol = http
.baseUrl("http://computer-database.gatling.io") // Here is the root for all relative URLs
.acceptHeader(
"text/html,application/xhtml+xml,application/xml;q=0.9,*/*;q=0.8"
) // Here are the common headers
.acceptEncodingHeader("gzip, deflate")
.acceptLanguageHeader("en-US,en;q=0.5")
.userAgentHeader(
"Mozilla/5.0 (Macintosh; Intel Mac OS X 10.8; rv:16.0) Gecko/20100101 Firefox/16.0"
)
val scn =
scenario("Scenario Name") // A scenario is a chain of requests and pauses
.exec(
http("request_1")
.get("/")
)
.pause(7) // Note that Gatling has recorder real time pauses
setUp(scn.inject(atOnceUsers(1)).protocols(httpProtocol))
}
To Run the script
In Terminal run
mvn gatling:test
This will execute a Gatling test using the Gatling Maven plugin

Importance of the packages
import io.gatling.core.Predef._
import io.gatling.http.Predef._
These imports are where the Gatling packages get imported - they are both required for all Gatling scripts.
import io.gatling.core.Predef._
This package provides Simulation , scenario, setup, exec
import io.gatling.http.Predef._
This package provides http, get
Note: We should always extend our Test class with Simulation class of the Gatling package, to make a Gatling script
Script has 3 areas
1.) HTTP Configuration
2.) Scenario Definition
3.) Load Scenario
HTTP Configuration
Here we setup the baseUrl and headers
Scenario Definition
Example: Go to API, wait , then second API , then Post some data
Load Scenario
This is where we set the load profile (such as the number of virtual users, how long to run for etc.) for our Gatling test.
Pause Time and Check Response Codes
.check(status.is(200)))
check(status.in(200 to 210))).pause(1,20)--> pause for a random time between 1 and 20 seconds
check(status.not(404),status.not(500))).pause(2000.millisecond)
Correlation in Gatling
The Check API in Gatling is used for 2 things:
1.) Asserting that the response contains some expected data
2.) Extracting data from that response
We can use JSONPath to extract some data from one call and save that in one variable then we can use that variable for subsequent API call now this process is called Correlation
check(jsonPath("$.name").is("some text")))
check(jsonPath("$[1].id").saveAs("variable")))
get("endpoint/${variable}").check(jsonPath("$.name").is("expected Name")))
How to write Methods
def getAll() = {
repeat(3) {
exec(http("Get All ").get("all").check(status.is(200)))
}
}
This way we can define methods
Here we can also give loop conditions like here repeat(3) will make 3 calls to all endpoint
Now we can use the above method for scenario
val scn = scenario("Code reuse")
.exec(getAll())
Gatling Feeders - for Test Data
Load Simulation
Sample Scenario
1.) Do nothing for 5 seconds
2.) Start up with 5 users
3.) Start 10 users within 10 seconds
Snippet
setUp(scn.inject(nothingFor(5),atOnceUsers(5),rampUsers(10).during(10))).protocols(httpConf)
Example:
setUp(scn.inject(nothingFor(1),atOnceUsers(150),constantUsersPerSec(100).during(5),
rampUsersPerSec(1) to (500) during(20))).protocols(httpConf)
JVM Heap
JVisualVM


Fixed Duration Load Simulation
For this we need to add forever() block in scenario() block

Make sure you have JDK 8 or new installed.
Unzip the file anywhere on your computer. Open up the new folder, and browse to the bin directory. From here.
1.) Run gatling.bat
Press 0 to choose the computerdatabase.BasicSimulation.
Description is optional and can be left blank.
Gatling will the script that you choose - which executes a basic load test against the Gatling computer database training site.
Results will be generated and looks like below
Gatling Project Setup
For Gatling we will write code in Scala.
Scala sits on top of the JVM, so any IDE which supports JVM we can use, I will be using IntelliJ
Gatling can be setup using Maven Build Tool
https://gatling.io/docs/current/extensions/maven_plugin/
Create Gatling Project with Maven Archetype
1.)Open CMD and type mvn archetype:generate
You will see message like below
2.) Choose a number or apply filter (format: [groupId:]artifactId, case sensitive contains): 1589:
Type gatling
Press 1 and then choose 35 as the version
groupId : com.gatlingTest
artifactId: myGatlingTest
version: 1.0-SNAPSHOT
for package press Enter to accept com.gatlingTest as the package name
Press Y to confirm
You will see message like
[INFO] Project created from Archetype in dir: C:\Users\T460\myGatlingTest
[INFO] ------------------------------------------------------------------------
[INFO] BUILD SUCCESS
[INFO] ------------------------------------------------------------------------
[INFO] Total time: 13:05 min
[INFO] Finished at: 2020-04-18T13:43:17+08:00
[INFO] Final Memory: 16M/291M
[INFO] ------------------------------------------------------------------------
3.) Now Import the created project in IntelliJ IDEA
This is how project Structure looks like
4.) Download Scala libraries from here
https://www.scala-lang.org/download/
Now after restart ,Go to Scala file and you will see option on the top to "Setup Scala SDK" refer below Screenshot
Click Create Button select the version and Click OK
Right-click on the scala folder and click Mark Directory As -> Test Sources Root:
Also mark the main src folder as sources root as well
Add a Sample Gatling Script
Right-click on the scala folder and select New > Scala Package - give the package a name of computerdatabase . Right click on this folder and select New > Scala Class - give the class a name of BasicSimulation.
Sample Script
package computerdatabase
import io.gatling.core.Predef._
import io.gatling.http.Predef._
import scala.concurrent.duration._
class BasicSimulation extends Simulation {
val httpProtocol = http
.baseUrl("http://computer-database.gatling.io") // Here is the root for all relative URLs
.acceptHeader(
"text/html,application/xhtml+xml,application/xml;q=0.9,*/*;q=0.8"
) // Here are the common headers
.acceptEncodingHeader("gzip, deflate")
.acceptLanguageHeader("en-US,en;q=0.5")
.userAgentHeader(
"Mozilla/5.0 (Macintosh; Intel Mac OS X 10.8; rv:16.0) Gecko/20100101 Firefox/16.0"
)
val scn =
scenario("Scenario Name") // A scenario is a chain of requests and pauses
.exec(
http("request_1")
.get("/")
)
.pause(7) // Note that Gatling has recorder real time pauses
setUp(scn.inject(atOnceUsers(1)).protocols(httpProtocol))
}
To Run the script
In Terminal run
mvn gatling:test
This will execute a Gatling test using the Gatling Maven plugin
Importance of the packages
import io.gatling.core.Predef._
import io.gatling.http.Predef._
These imports are where the Gatling packages get imported - they are both required for all Gatling scripts.
import io.gatling.core.Predef._
This package provides Simulation , scenario, setup, exec
import io.gatling.http.Predef._
This package provides http, get
Note: We should always extend our Test class with Simulation class of the Gatling package, to make a Gatling script
Script has 3 areas
1.) HTTP Configuration
2.) Scenario Definition
3.) Load Scenario
HTTP Configuration
Here we setup the baseUrl and headers
Scenario Definition
These are the steps that the user will take when interacting with our application
Example: Go to API, wait , then second API , then Post some data
Load Scenario
This is where we set the load profile (such as the number of virtual users, how long to run for etc.) for our Gatling test.
Pause Time and Check Response Codes
.check(status.is(200)))
check(status.in(200 to 210))).pause(1,20)--> pause for a random time between 1 and 20 seconds
check(status.not(404),status.not(500))).pause(2000.millisecond)
Correlation in Gatling
The Check API in Gatling is used for 2 things:
1.) Asserting that the response contains some expected data
2.) Extracting data from that response
We can use JSONPath to extract some data from one call and save that in one variable then we can use that variable for subsequent API call now this process is called Correlation
check(jsonPath("$.name").is("some text")))
check(jsonPath("$[1].id").saveAs("variable")))
get("endpoint/${variable}").check(jsonPath("$.name").is("expected Name")))
How to write Methods
def getAll() = {
repeat(3) {
exec(http("Get All ").get("all").check(status.is(200)))
}
}
This way we can define methods
Here we can also give loop conditions like here repeat(3) will make 3 calls to all endpoint
Now we can use the above method for scenario
val scn = scenario("Code reuse")
.exec(getAll())
Gatling Feeders - for Test Data
CSV Feeders
We can create a csv file under src > test > resources folder
val csvFeeder=csv("data/csvFile.csv").circular
There are 4 ways to Load data in Gatling
.queue - default behavior: use an Iterator on the underlying sequence
.random - randomly pick an entry in the sequence
.shuffle - shuffle entries, then behave like queue
.circular - go back to the top of the sequence once the end is reached
Custom Feeders
By Using Custom Feeders we can create test data directly in our code
Load Simulation
Sample Scenario
1.) Do nothing for 5 seconds
2.) Start up with 5 users
3.) Start 10 users within 10 seconds
Snippet
setUp(scn.inject(nothingFor(5),atOnceUsers(5),rampUsers(10).during(10))).protocols(httpConf)
Other ways
constantUsersPerSec (rate) during (duration)- Here users will be injected at constant rate, defined in seconds
rampUsersPerSec(rate1) to (rate2) during (duration)- Inject users from rate 1 to rate 2.
Example:
setUp(scn.inject(nothingFor(1),atOnceUsers(15),constantUsersPerSec(10).during(5),
rampUsersPerSec(1) to (50) during(20))).protocols(httpConf)
Example:
setUp(scn.inject(nothingFor(1),atOnceUsers(150),constantUsersPerSec(100).during(5),
rampUsersPerSec(1) to (500) during(20))).protocols(httpConf)
JVM Heap
JVisualVM
Fixed Duration Load Simulation
For this we need to add forever() block in scenario() block


No comments:
Post a Comment